Tuesday, March 27, 2012

The Beatle and the Butterfly

The Dogbane Beetle

The shell isn't quite right, but I gave in as I drew this in my lap at the doctor's office... 
At our coop we have been studying beetles and butterflies -- How God made them with such unique proportions, their coloring, legs, etc.  With my engineering background, one of my favorite things to do is get out a ruler and look for equivalent lengths and straight (or almost straight) lines. It is fun to discover how the butterfly's upper wing has a straight line on the bottom edge and how the wings are usually about as wide as the body is long at that edge. It also has an upper wing that is usually at least 1.25 times up to 1.5 times the length of the body and the antennae are not longer than the body length.  It is fascinating how the upper wings swoop out so far up and out! Even more amazing is how these huge wings and all the legs come out from the small segment of the body in the middle: the thorax...

Well - on to art!  So, after discovering all these wonderful things about both beetles and butterflies, our class will make our own butterfly with markers, metallic colored pencils, and shiny origami papers.
The first step would be to draw your basic butterfly outline... Mine must have been convincing as Chloe would not let me get coloring  :D


Next you will follow your plan to design the wings. I used metallic colored pencils as my starting point. I made the major section designations, dividing the each wing into two main parts with a "swoopy" thing.  Also, students, note that I used the odd number rules :D 

Here is how I made the paper cutouts--the easy way! I colored in the edges of the shape that will be covered in paper. Then using tracing paper, I traced the shape with a pen.  Then I take the tracing paper and lay it on my origami paper. 

Retrace the shape. You can see that it leaves a dent on the paper for you to follow when you cut it -- No ink line on your paper!


Here is the shape after it is cut out. Because I colored in around the shape in the green pencil, if the shape isn't perfect it won't matter. 

As I designated these areas, I found that my butterfly needed to have some nice black lines to help make it pop. 

Here you can see the green sections before the papers are glued in . 

Here she is. I think my students may cut theirs out and put them on colored paper, but I am not decided yet. Hoping to post some fun photos of their work when they are done! 


Sunday, January 22, 2012

Columns Crashing Down

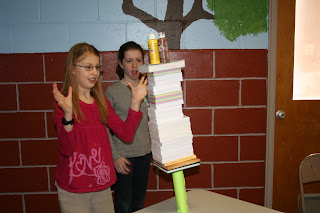
I will be teaching my art students about The Classical Order in our next few coops. I wanted a fun way to introduce the topic as we will be doing some deep "analysis" and drawing. I came across a lady that had her students make a column out of paper and stack books on top to see how strong it was. I decided to try this -- It was fun:D

So, I set some rules: One piece of paper - rolling, no folding, no cutting... three 1" pieces of tape...stack as many things on top of it as you can. Here are some of the results! (They stacked mostly index card packages and then a few books)


They began to evaluate how tightly they should roll the paper; vertical or horizontal rolling; and more.  It was a great opener to studying the amazing column!  Try this at home with your children :D

Tuesday, January 17, 2012

Puzzled by Puzzles?

Oh, how I love a good puzzle! Food for the brain. This Christmas our family was able to get back to doing our traditional puzzle. You see, we have cats. Cats that like puzzles. Cats that want to participate in the process, keep you company, and help while you are sleeping :D I have looked at the puzzle keepers that you can purchase for between $12-$20. I found some on sale and brought them home - two: one for building the puzzle on and the other for putting all the pieces on. When I opened it, I guess I was expecting some miraculous green fabric thing that came from Jupiter - NOT. It was felt. Just felt and a cardboard tube about 4" in diameter that you put together and rolled the felt onto. 

OK. I'm thinking: 1st, it really isn't big enough; 2nd, I can get felt cheaper than that!; 3rd, a piece of pvc would work just as good as that tube!  So I returned them and was off to Hancock. I purchased several yards of nice thick green felt on sale for under $3 a yard. Then, Lowes for my tube. I was all set! 

First we put together the "Deck the Halls" by Springbok (at the top of the post.)


Fun puzzle...only 500 pieces. Just about right for a two night completion. Love it!  The felt worked perfectly, keeping the pieces on the table even though we had some helpers!


Then for Christmas, we gave our girls (well, it was probably as much for me!) the "Buttons, Buttons" 2000 piece puzzle... Now, that is a puzzle! 
It is about 3' by 2'. It had fantastic pieces and I just LOVED making it. The felt table cover went onto our large dining room table. I measured out the space for the puzzle and marked it. Then started searching for end pieces. At the other end of the table I put the pieces that weren't ends into groups: greens, reds, blues, distinct textures, yellows. The gold tone pieces I pretty much just all put together in one section or tried to leave in the box to save space.

We had to roll up the puzzle about 1/2 way through construction for my daughter's birthday dinner-- I admit it, I was very scared! But, it worked beautifully. We folded the felt over the top and made a sandwich, then used the tube and rolled it up. Held it together with little ribbons that had velcro ends (from the girls' pajama wrappings)... amazing!

I have made Springbok puzzles since I was a kid- they are worth every penny...esp. for the larger ones. Neat pieces and intricate designs. I can't wait for the next one -- I think I'll go raid my stash... snow cones or chocolate?

The Day Has Come!

Who thought of this modern design of "downgraded" laundry rooms? The last thing I want to see when I first return home is laundry! That was the one thing about this house I didn't care for. We debated putting a laundry room in our basement, but thought the additional flight of stairs wasn't worth it. Hence, I have the laundry room/walk-thru to my garage design. 

To top that off, our huge kitchen had a tiny pantry. When we first moved in, my gracious husband gave me a quick fix with some open shelving...oh, did I say some? Really it was a ton--practically wall-to-wall. But, as hard as I tried to keep it looking neat (lining up the cans, face forward, keeping like things together, etc.), it just never looked clean and organized. He promised that one day he would build me a pantry -- that day has come! 

This Christmas break afforded the opportunity to build my new pantry, and by the way, replace the floor, add cabinets over the washer/dryer instead of that open wire shelving, and close up the laundry shoot (I know, "What? Close up a laundry shoot?" - but it wasn't in the right place) So, can anyone say, "Bonus!"

I was fearful of actually posting the before photo, but, who could appreciate the beauty of the remodel without it? Here is my husband at the start, removing all of the items from the wire shelving. The other wall to the left is solid wood shelving. 


After all the demolition, while my husband began the pantry unit, I began the new floor. The Lord provided this beauty of a remnant from Corvin's Flooring. I walked in and there it was for $90!  I took off the moldings, repaired the old vinyl under the washer feet where it had torn, and made a template of the floor. It was pretty cool -- This Old House had a few great tutorials on floor replacements. I loved the idea of using a square to mark all the walls back onto the paper (I know-- hard to picture. You'll have to look it up!) Below is the template laying on my new flooring.


At this point, you simply cut the vinyl with a box cutter (put something under it so you don't cut your other floor--eek!) Then I rolled it up and dry fit it in the room. Totally wonderful! I used the tape adhesive product which was highly recommended for type of remodel. It worked easily and quickly. 


Here are the parts of the pantry that go against the wall (in my dining room before painting). He designed these cabinets so that the doors have shelves as well. They are amazing! It took a bit of painting and sealing, but they are came out beautifully and hold a ton.


I will be posting the rest of the photos soon... :D I am painting a scene on the front doors of the pantry and can't quite decide what to have -- distant landscaping/huge part of a tree/???   Any suggestions?
 What would you like to look at as you walk into your laundry room?  Can't wait to share more.  Thank you, Honey! You are the best!

Saturday, January 7, 2012

Eggshell Mosaic Follow-up


What an amazing and beautiful project this is! I was so excited to teach this to my students and they are simply fabulous. I was very concerned about the final step of exposing the eggshells -- it requires a firm, but gentle touch and patience as the paintbrush acts as a wick but you need to push the varnish off and around the tops of the eggshells. Some tricky business! My students made it look easy!


This project was also a reminder to me that the Lord demands our continued reliance and trust. He is sufficient in all situations and we are to give Him praise and glory. If you are ever in a situation that you don't understand, stop and ask yourself, "Lord show me how you are glorified in this." He is and He does. He is the perfect Creator, the One with whom we can do all things well. Lord you are glorified in these childrens' work and joy at the outcome, in the beauty and amazing structure of these eggshells, in the vibrancy of the colors, and you can be glorified in our response to blown fuses and misunderstood directions. 

May this Christmas season be a time that you trust and rely on our Lord and Savior and look to give God the glory in all you do. 

Friday, January 6, 2012

Counted Cross stitch? NO! Needlepoint.

My father-in-law is a needlepoint man. NOT counted cross stitch. I can't say I blame him! Who can pay that much attention, counting across lines, changing up threads, ick!  I LOVE needlepoint and grew up doing it. Well, needless to say (;D) it is difficult today to get a good needlepoint kit. 


A few years ago Dad wanted to complete his collection of churches - one for each season. He needed a small chapel in a winter setting. Good luck! So, I designed him one in photoshop from some photos I took and a few I purchased on istockphoto.com. Once I made the composite photo, I followed the recommended modifications and used a website service to convert it to a needlepoint pic. I paid the service to provide the color listing and the "converted picture," and then I used iron-on transfer to print the picture and then apply it to ada cloth.  It was quite the project, but came out beautifully...

For Christmas this year, he wanted a new canvas to work on - a mill. Lucky for me, he picked out a Mabry Mill design which was in counted cross stitch and said, "I like this one!" After evaluating all the software options out there for converting photos to needlepoint, I came to the conclusion that the best option would be to buy this Mabry Mill kit (above) with all the stitch details, picture, and other instructions, and then scan/scale/apply the photo to the canvas he wanted to use. I am very much a stickler for copyright violations, however, in this case, as I purchased the 'kit', I don't feel that modifying the photo and transferring it to the cloth violates the law. Here is what it looks like:


The one draw back is that you do have to be careful with the printing as you work. Dad puts it on a stretch frame so that it isn't bent a lot and won't rub off. He said going through the layer of iron-on transfer isn't bad. This photo was ideal in that he can actually see the stitches that were in the original photo of the finished cross stitch whereas the winter chapel was simply a 'photo'. 

He does a beautiful job and has already started stitching the trees in the upper left corner. I can't wait to see the masterpiece! So, if you are a frustrated needle-pointer, try converting one of the thousand beautiful counted cross stitch designs on your own (just remember to pay for them!) :D